50 Components Course: FiniteStateMachine
16 min read
Table of contents
Demo & Sources
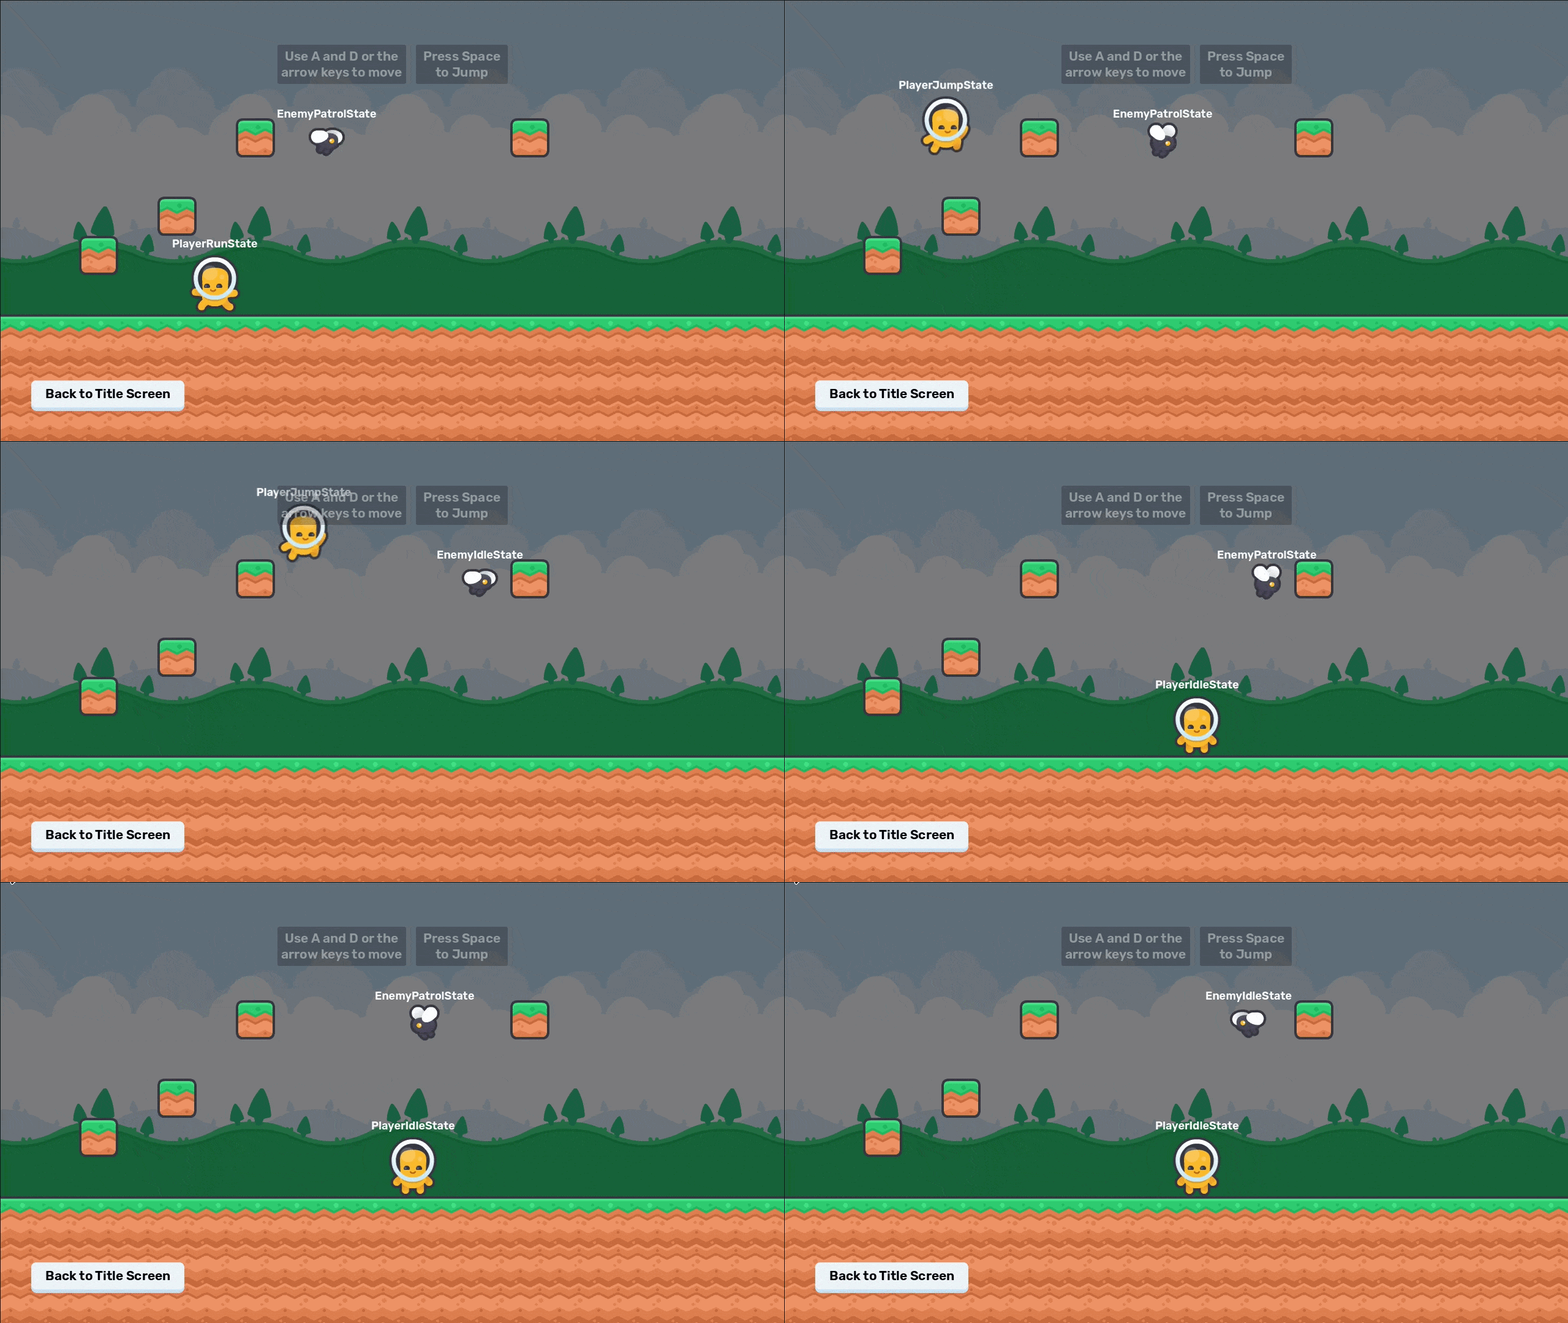
You can try it yourself live here.
The source code is available on GitHub:
Design
What is the best way to design a component? It can be a bit tricky to understand at first, but here's a checklist:
- rule #1: it only does ONE thing!
- rule #2: it is generic, so you can use it for any game.
- rule #3: it has as little dependencies as possible.
- rule #4: it can be used from the outside, by its owner.
Enforcing rule #1 makes sure you do not overscope your components.
Rule #2 makes sure you can reuse your components, in- and outside your current game project. Compare a Sprite2D node to an RPG talent tree and skill system. Sprite2D does one thing, displays an image. You can use that for any 2D game to display images. The RPG talent tree and skill system is not a component because it is highly specific to RPG games.
Rule #3 helps keep your components flexible. Fewer dependencies mean that the component can be used in different contexts. Too many dependencies often suggest a use-case that is too specific.
Rule #4 establishes a standard communication line in your component-based games. There are 3 main ways of communication.
- A component can notify the outside world of an event happening with a signal (outside world is almost always the owner)
- The owner of the component can use the component's functionality through its public method(s).
- The owner of the component can affect the behaviour of a component by changing its properties.
To make the process of designing a component easier, ask these three questions.
What is the ONE thing this component does?
It is a lightweight Finite State Machine (FSM) implementation. An FSM manages actor behaviors by isolating logic into different States. If you're new to the concept of a Finite State Machine, I recommend reading this awesome chapter from the freely available Game Programming Patterns book, by Robert Nystrom.
What DATA the component needs to do its thing?
- actor: a Node which the FSM acts upon.
Note: this implementation will require zero setup: the actor assigned will always be the parent of the FiniteStateMachine.
How does it communicate with the outside world?
FSMs are very self-contained by nature, managing all the behavioural changes. There are many ways to handle communication. My preferred way involves States emitting signals when something notable happens, more on that later. The FSM itself provides 2 main ways to communicate:
change_state(): a public method which changes thecurrent_stateof the FSM to a new State. The new State is also returned from the method.state_changed: a signal emitted when the FSM successfully changes to a new State.
Implementation
class_name State
extends RefCounted

var actor: Node


func enter() -> void:
	pass


func exit() -> void:
	pass


func update(_delta: float) -> void:
	pass


func physics_update(_delta: float) -> void:
	pass


func unhandled_input(_event: InputEvent) -> void:
	pass
First, a bare-bones State class is created. It extends from the RefCounted class. I won't go into too much detail about this class here, as there are a lot of great videos, explanations (explanation + docs) are available. The TLDR; is that they are memory objects that are automatically deleted if there are no references to them.
All States need to have access to an actor they can act upon. This is a Node member variable. Note that we cannot use Node2D, Node3D or Control here because that would limit the FSM to be only used for 2D, 3D or UI. Instead, we just say it's a node, and each specific FSM and their States can type cast their actor with the as keyword to have access to auto-completion.
After the member variable, the following methods are defined, with empty bodies:
enter(): called once, when the FSM changes into that State.exit(): called once, when the FSM changes into a new State, overriding the current one.update(): called once every frame.physics_update(): called once every physics tick.unhandled_input(): called whenever the FSM registers anInputEvent.
Some extra thoughts about using RefCounted for the States
(skip this if you are not interested)
Some people might prefer to see their States as Nodes in the SceneTree and I definitely used that approach in the past (see my roguelike deckbuilder course, for example).
In retrospect, I think this is a cleaner solution, as only the "head" (the FSM itself) is part of the SceneTree. All states are self-contained, containing only their own logic in a script file. No extra Nodes, Scenes or Resource files are needed besides the script itself.
Anyways, let us move on to the Finite State Machine itself.
@icon("finite_state_machine.svg")
class_name FiniteStateMachine
extends Node
First, a custom icon is provided which makes the component feel like it is part of the Godot ecosystem when you add it to the SceneTree.
Then, a custom class_name is set and the class is extended from the base Node class.
You can read more about the @icon annotation here.
signal state_changedA signal is defined for when the FSM successfully changes to a different state.
@onready var parent := get_parent()
var current_state: State
A reference to the parent Node of the FSM itself is stored when the Node gets ready in the SceneTree. The parent reference will be injected into all States as the actor Node.
Also, the currently active State is stored in a publicly accessible member variable.
func _process(delta: float) -> void:
	if current_state:
		current_state.update(delta)


func _physics_process(delta: float) -> void:
	if current_state:
		current_state.physics_update(delta)


func _unhandled_input(event: InputEvent) -> void:
	if current_state:
		current_state.unhandled_input(event)
Since the States are not Nodes but RefCounted objects, they do not have access to the usual Node-related virtual methods. Here, we expose the _process(), _physics_process() and _unhandled_input() methods. If there is a currently active State, we call the corresponding methods each frame, physics tick or InputEvent, respectively.
func change_state(new_state_class: GDScript) -> State:
	if current_state:
		current_state.exit()
        current_state = null
Next, the change_state() method is defined. The new state is defined as a GDScript Resource, which is very handy. Why? If all States in our game consistently have custom class_names, the global namespaces allows us to change into a new state using the class name like so: fsm.change_state(RunState)
The method begins with a safety check. If there is an active state, we exit it by calling State.exit(), then set the current_state to null.
This is useful, so if the FSM fails to change into a new state (for whatever reason), it will not be stuck inside the previous State.
    var next = new_state_class.new()
	if not next is State:
		push_error("FSM: Class %s does not extend State." % new_state_class)
		return null
Next, a new instance of the passed parameter is created with GDScript.new().
Then, a safety check if performed. The script is required to be a State so it has the must-have methods and the actor member variable. If it is not a State, an error message is displayed and we can return null, indicating that the FSM is not in any valid State at the moment.
    current_state = next
	current_state.actor = parent
	current_state.enter()
    state_changed.emit()

    return current_state
Finally, if it is a valid State, it is safe to execute the transition:
- The newly instantiated
Statein next becomes thecurrent_state. - The
parentmember variable is injected to the current_state, as itsactor. - The current_state's
enter()method is called. - the
FSM.state_changedsignal is emitted, - and finally, the
change_state()method return this new current_state so it can be used outside.
Example Use Case
Take a look at this Scene setup:
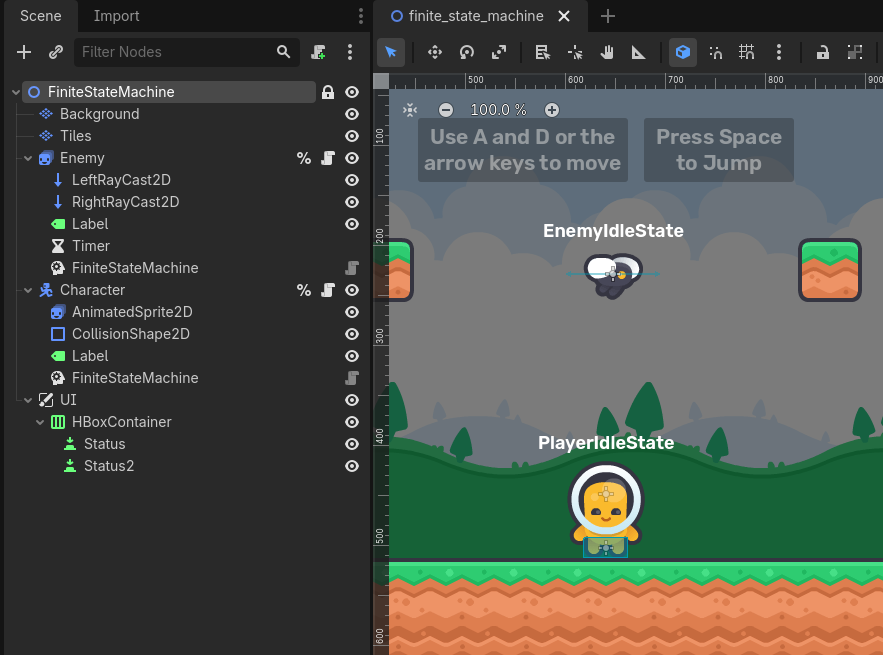
There is an AnimatedSprite2D for the enemy, with two Raycast2Ds, a Label, a Timer and a FiniteStateMachine attached to it. The Enemy Node's fly_speed can be set from the inspector.
There is a CharacterBody2D for the character, with an AnimatedSprite2D, a CollisionShape2D, a Label and a FiniteStateMachine attached to it. The Character Node can be tweaked with some export variables that you will see in the code section of the demo.
Both the Enemy and the Character have some animations set up. There are also two buttons for displaying some tutorial text.
Here is the state machine logic we want to implement for the enemy:
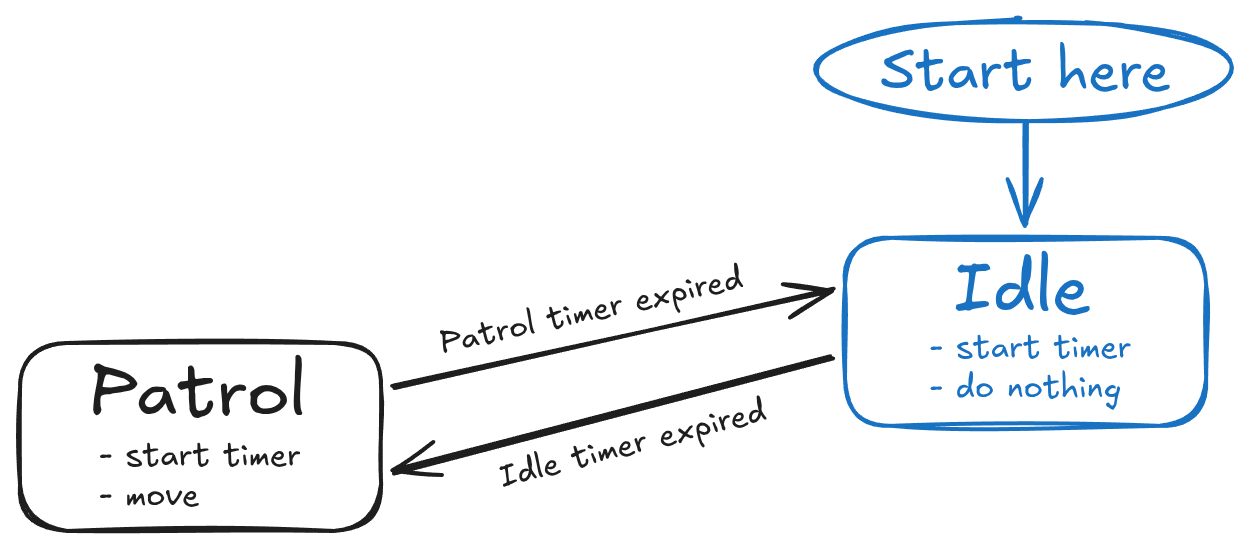
First, let us start with the Enemy's script, because the Patrol State needs to have access to the RayCast2D Nodes and the fly_speed export variable.
class_name Enemy
extends AnimatedSprite2D

@export var fly_speed: int = 300

@onready var left_ray_cast_2d: RayCast2D = $LeftRayCast2D
@onready var right_ray_cast_2d: RayCast2D = $RightRayCast2D
@onready var label: Label = $Label
@onready var timer: Timer = $Timer
@onready var fsm: FiniteStateMachine = $FiniteStateMachine

var direction: Vector2 = Vector2.RIGHT


func _ready() -> void:
	_idle()
	fsm.state_changed.connect(_on_state_changed)


func _on_state_changed() -> void:
	label.text = fsm.current_state.get_script().get_global_name()


func _idle() -> void:
	timer.wait_time = 2.0
	timer.start()
	fsm.change_state(EnemyIdleState)
	timer.timeout.connect(_patrol, CONNECT_ONE_SHOT)


func _patrol() -> void:
	timer.wait_time = 6.0
	timer.start()
	fsm.change_state(EnemyPatrolState)
	timer.timeout.connect(_idle, CONNECT_ONE_SHOT)
First, a bunch of variables are defined. The fly_speed is an export variable, then we grab references to some child nodes, and finally store the current movement direction in a member variable.
Then, inside _ready(), there is an immediate transition to the EnemyIdleState by calling _idle(). Also, the FSM's state_changed signal is connected to the _on_state_changed() method which updates the Label for debugging purposes.
When transitioning to the EnemyIdleState with _idle():
- The Timer Node's wait time is set to 2 seconds,
- then the Timer starts,
- then
FiniteStateMachine.change_state()is called with EnemyIdleState as a parameter, - finally, the Timer's timeout signal is connected to the
_patrol()method, with the CONNECT_ONESHOT flag.
When transitioning to the EnemyPatrolState with _patrol():
- The Timer Node's wait time is set to 6 seconds,
- then the Timer starts,
- then
FiniteStateMachine.change_state()is called with EnemyPatrolState as a parameter, - finally, the Timer's timeout signal is connected to the
_idle()method, with the CONNECT_ONESHOT flag.
class_name EnemyIdleState
extends State
That's it for the Idle State :)
Nothing needs to be done here since the Enemy only has one animation playing on loop anyways. The Timer and transitioning is already handled by the Enemy itself.
class_name EnemyPatrolState
extends State

var enemy: Enemy


func enter() -> void:
	enemy = actor as Enemy


func physics_update(delta: float) -> void:
	if enemy.left_ray_cast_2d.is_colliding() or enemy.right_ray_cast_2d.is_colliding():
		enemy.direction *= -1
		enemy.flip_h = not enemy.flip_h

	enemy.position += enemy.direction * enemy.fly_speed * delta
The Patrol State is not too complicated either. Inside _enter(), the actor (Node) is type cast to Enemy and also stored in a member variable. This is good practice because the Enemy will be accessible in all the other methods with auto-completion.
Then, inside physics_update(), a check is done first. If either of the RayCast2Ds is colliding with a wall, the Enemy needs to be flipped. That means two things:
- Multiplying the Enemy's direction vector by -1 so it moves in the other direction.
- Flipping the Enemy's AnimatedSprite2D to the other side on the horizontal axis.
Finally, the Enemy's position is updated based on its current direction and fly_speed (both are defined in the Enemy's script). It is of course multiplied by delta to make it frame rate independent.
That wraps up the Enemy's FSM demo. You can try it out before moving on to the Player Character's FSM.
Here is the state machine logic we want to implement for the player character:
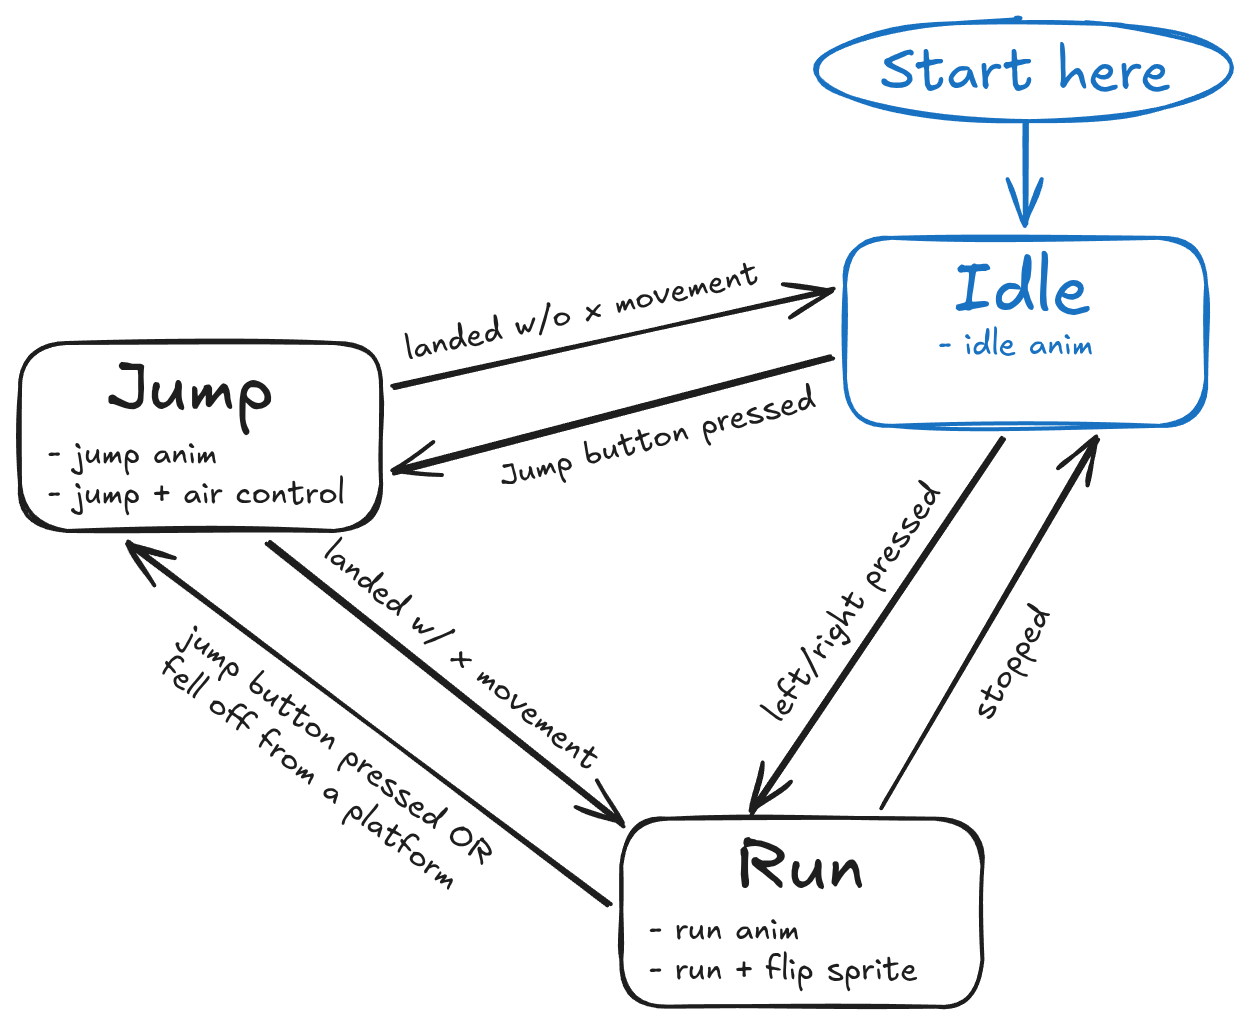
First, let us start with the Character's script, because the some States need to have access to child Nodes and export variables.
class_name Player
extends CharacterBody2D

@export var move_speed: int = 300
@export var jump_force: int = -600
@export var air_control: float = 0.75
@export var gravity: float = 980.0

@onready var animated_sprite_2d: AnimatedSprite2D = $AnimatedSprite2D
@onready var collision_shape_2d: CollisionShape2D = $CollisionShape2D
@onready var label: Label = $Label
@onready var fsm: FiniteStateMachine = $FiniteStateMachine


func _ready() -> void:
	_idle()
	fsm.state_changed.connect(_on_state_changed)


func _on_state_changed() -> void:
	label.text = fsm.current_state.get_script().get_global_name()


func _idle() -> void:
	var idle_state := fsm.change_state(PlayerIdleState) as PlayerIdleState
	idle_state.jump_pressed.connect(_jump, CONNECT_ONE_SHOT)
	idle_state.move_pressed.connect(_run, CONNECT_ONE_SHOT)


func _jump() -> void:
	var jump_state := fsm.change_state(PlayerJumpState) as PlayerJumpState
	jump_state.landed.connect(_idle, CONNECT_ONE_SHOT)
	jump_state.landed_with_movement.connect(_run, CONNECT_ONE_SHOT)


func _run() -> void:
	var run_state := fsm.change_state(PlayerRunState) as PlayerRunState
	run_state.stopped.connect(_idle, CONNECT_ONE_SHOT)
	run_state.fell.connect(_fall, CONNECT_ONE_SHOT)
	run_state.jump_pressed.connect(_jump, CONNECT_ONE_SHOT)


func _fall() -> void:
	_jump()
	velocity.y = 0.0
Note: this is by no means a good or extensive platforming character controller. This is just a demonstration because platformer character controllers are a good example for using a FSM. If you are interested in making a good platformer character controller, there are a lot of good resources out there.
First, a bunch of variables are defined. 4 export variables are used for controlling the platforming, then we grab @onready references to child nodes.
Then, inside _ready(), there is an immediate transition to the PlayerIdleState by calling _idle(). Also, the FSM's state_changed signal is connected to the _on_state_changed() method which updates the Label for debugging purposes.
When transitioning to the PlayerIdleState with _idle():
FiniteStateMachine.change_state()is called with PlayerIdleState as a parameter, and the resulting new state is stored in a variable.- Afterwards, the two transitions from the graph are implemented with two signal connections, connected with the CONNECT_ONESHOT flag:
- If jump was pressed when idle → call
_jump(). - If a horizontal movement was recorded when idle → call
_run().
When transitioning to the PlayerJumpState with _jump():
FiniteStateMachine.change_state()is called with PlayerJumpState as a parameter, and the resulting new state is stored in a variable.- Afterwards, the two transitions from the graph are implemented with two signal connections, connected with the CONNECT_ONESHOT flag:
- If landed without input after jumping → call
_idle(). - If a horizontal movement was recorded when landing → call
_run().
When transitioning to the PlayerRunState with_run():
FiniteStateMachine.change_state()is called with PlayerJumpState as a parameter, and the resulting new state is stored in a variable.- Afterwards, the three transitions from the graph are implemented with three signal connections, connected with the CONNECT_ONESHOT flag:
- If the player stopped without input when running → call
_idle(). - If the player fell off a platform when running → call
_fell()which is a special case. - If the player pressed jump when running → call
_jump().
Falling down needs to be handled differently. Why? Because when we enter() the jumping state, an upwards Y velocity is immediately applied so the character starts jumping up.
However, this needs to be cancelled out when falling down. Otherwise, falling off a platform would automatically result in the character performing a jump without the player pressing the jump button.
The _fall() method does exactly that. AFTER entering the jump state successfully, it sets the velocity's y component to zero so the character will not jump up, but gravity will affect it over the next frames.
An alternative solution would be to introduce a completely different PlayerFallState but I wanted to keep it simple for this demo.
Now for the implementation of the States.
class_name PlayerIdleState
extends State

signal jump_pressed
signal move_pressed

var player: Player


func enter() -> void:
	player = actor as Player
	player.animated_sprite_2d.play("idle")
	player.velocity.x = 0.0


func physics_update(_delta: float) -> void:
	if not player:
		return

	player.move_and_slide()


func unhandled_input(event: InputEvent) -> void:
	if event.is_action_pressed("jump"):
		jump_pressed.emit()
	else:
		var direction := Input.get_axis("move_left", "move_right")
		if not is_zero_approx(direction):
			move_pressed.emit()
First, PlayerIdleState.
Two signals are defined for the two events that trigger transition: pressing the jump button, and pressing the left or right movement keys.
Next, inside _enter(), the actor (Node) is type cast to Player and also stored in a member variable. Then, the idle animation is played and the player's x velocity is reset to 0.
Then, inside physics_update(), the player CharacterBody2D is moved if there is any residual velocity that needs to be applied (this is very unlikely as we explicitly set the x velocity to 0).
The important part is in unhandled_input():
- If the jump button was pressed, or
- a non-zero horizontal input movement is detected → emit the corresponding signal.
class_name PlayerJumpState
extends State

signal landed
signal landed_with_movement

var player: Player


func enter() -> void:
	player = actor as Player
	player.animated_sprite_2d.play("jump")
	player.velocity.y = player.jump_force


func physics_update(delta: float) -> void:
	if not player:
		return

	var direction := Input.get_axis("move_left", "move_right")
	if not is_zero_approx(direction):
		player.velocity.x = direction * player.move_speed * 0.7
		player.animated_sprite_2d.flip_h = direction < 0.0
	else:
		player.velocity.x = move_toward(player.velocity.x, 0.0, player.move_speed * 2 * delta)

	player.velocity.y += player.gravity * delta
	player.move_and_slide()

	if player.is_on_floor():
		if not is_zero_approx(direction):
			landed_with_movement.emit()
		else:
			landed.emit()
In the PlayerJumpState, two signals are defined for the two events that trigger transition: landing on the floor with- and without horizontal input.
Next, inside _enter(), the actor (Node) is type cast to Player and also stored in a member variable. Then, the jump animation is played and the player's y velocity is set to the jump_force variable.
Then, inside physics_update(), there is a safety check. If there is no valid player, there is nothing to do.
Otherwise, we grab the direction vector for horizontal input for a basic air control implementation. In most platformers, the player can steer the Character mid-air, but usually less so than on the ground. There are two cases:
- If there is a non-zero direction input: the character moves with 70% of its normal velocity. Also, the AnimatedSprite2D's flip_h needs to be updated based on the direction.
- If there is no direction input: friction is applied on the x velocity, using move_toward(). It is a strong friction in this case, so the the character "slows" to a horizontal halt in the air quicker.
After air control, gravity is applied to the y velocity, and the character is moved with CharacterBody2D.move_and_slide().
Finally, we need to check for landing after moving the character. If it landed on the ground this frame, there are two cases to handle:
- Landing with horizontal input emits the
landed_with_movementsignal, - but if there is no horizontal input, the
landedsignal gets emitted.
class_name PlayerRunState
extends State

signal stopped
signal jump_pressed
signal fell

var player: Player


func enter() -> void:
	player = actor as Player
	player.animated_sprite_2d.play("run")


func physics_update(_delta: float) -> void:
	if not player:
		return

	var direction := Input.get_axis("move_left", "move_right")

	if is_zero_approx(direction):
		stopped.emit()
		return

	player.velocity.x = direction * player.move_speed
	player.animated_sprite_2d.flip_h = direction < 0.0
	player.move_and_slide()

	if not player.is_on_floor():
		fell.emit()


func unhandled_input(event: InputEvent) -> void:
	if event.is_action_pressed("jump"):
		jump_pressed.emit()
Finally, in the PlayerRunState three signals are defined for the three events that trigger transition: stopping when there is no horizontal input, pressing jump and falling off a platform while running.
Next, inside _enter(), the actor (Node) is type cast to Player and also stored in a member variable. Then, the run animation is played.
Then, inside physics_update(), there is a safety check. If there is no valid player, there is nothing to do.
Otherwise, we grab the horizontal input direction vector for running. If there is no input, it is safe to emit the stopped signal. Also, we can return from the method earlier because the character should not be moved in this case.
If there is valid horizontal input, the player's x velocity and the AnimatedSprite2D's flip_h property are set. Then, the character is moved with CharacterBody2D.move_and_slide().
Next, we check if the character has fallen off a platform after moving. If so, the fell signal gets emitted.
Finally, inside unhandled_input(), if the jump button was pressed, the jump_pressed signal is emitted.
After finishing all three state scripts, I recommend revisiting the player character's script and the FSM graph, so you can understand how the triggering signals, transitions and logic are connected.
That wraps up the FiniteStateMachine component! :)