50 Components Course: Wrap2D
Table of contents
Demo & Sources
You can try it yourself live here.
The source code is available on GitHub:
Design
What is the best way to design a component? It can be a bit tricky to understand it at first, but here's a checklist:
- rule #1: it only does ONE thing!
- rule #2: it is generic, so you can use it for any game.
- rule #3: it has as little dependencies as possible.
- rule #4: it can be used from the outside, by its owner.
Enforcing rule #1 makes sure you do not overscope your components.
Rule #2 makes sure you can reuse your components, in- and outside your current game project. Compare a Sprite2D node and an RPG talent tree and skill system. Sprite2D does one thing, displays an image. You can use that for any 2D game to display images. The RPG talent tree and skill system is not a component because it is highly specific to RPG games.
Rule #3 helps keeping your components flexible. Fewer dependencies mean that the component can be used in different contexts. Too many dependencies often suggest a too specific use-case.
Rule #4 establishes a standard communication line in your component-based games. There are 3 main ways of communication.
- A component can notify the outside world of an event happening with a signal (outside world is almost always the owner)
- The owner of the component can use the components functionality through its public method(s).
- The owner of the component can affect the behaviour of a component through changing its properties.
To make the process of designing a component easier, ask these three questions.
What is the ONE thing this component does?
It wraps any Node2D-derived Node safely around the screen on:
- the horizontal axis,
- the vertical axis,
- or both!
Note: it works for CharacterBody2D and RigidBody2D nodes as well!
What DATA the component needs to do its thing?
- a target Node to wrap around the screen
boolflags for enabling/disabling horizontal and vertical wrapping- a margin, i.e. the distance to pass beyond the screen edge before the wrap occurs.
How does it communicate with the outside world?
This component is a rare exception as it does not need to communicate with the outside world. It handles the wrapping itself directly for the target node, in the _physics_process() virtual method.
Implementation
@tool
@icon("wrap_2d.svg")
class_name Wrap2D
extends Node
The component shows node configuration warnings when the there is no target selected. For this, the script needs to run inside the editor, hence the @tool annotation.
Then, a custom icon is provided which makes the component feel like it is part of the Godot eco system when you add it to the SceneTree.
Finally, a custom class_name is set and the class is extended from the base Node class.
You can read more about node configuration warnings here, and about the @icon annotation here.
@export var target: Node2D = get_parent():
	set(new_target):
		target = new_target
		update_configuration_warnings()
An export variable is defined for the Node2D target. It defaults to the parent node of the Wrap2D component.
The custom setter function calls update_configuration_warnings() after setting the new value, so the editor can check if the correct node type was set for the variable.
@export var wrap_horizontally: bool = true
@export var wrap_vertically: bool = false
@export var margin: float = 32.0
Then, two boolean export variables are defined for vertical and horizontal wrapping.
If true, the target node can wrap around the given axis.
A margin value is also given which provides a distance beyond the screen edge before the wrap occurs. It is given in pixels.
var screen_size: Vector2The current size of the viewport is cached and stored in a member variable. Then, the component can listen to the size_changed signal of the viewport, so the Wrap2D functions properly even if the viewport gets resized.
func _ready() -> void:
	_update_screen_size()
	get_viewport().size_changed.connect(_update_screen_size)
Inside _ready(), the screen_size variable is set by calling the _update_screen_size() method (yet to be implemented).
The same method needs to be called when the viewport emits the size_changed signal.
func _get_configuration_warnings() -> PackedStringArray:
	if not target or not target is Node2D:
		return ["No valid target set for the Wrap2D Component!"]
	else:
		return []
Next, the built-in _get_configuration_warnings() method is overrode. There are two cases to handle:
- if the target export variable is null or not a Node2D, a reminder warning is displayed,
- when the correct export variable is set no warnings are displayed.
func _physics_process(_delta: float) -> void:
	if not target or Engine.is_editor_hint():
		return

	if target is RigidBody2D:
		_wrap_rigidbody(target)
	else:
		target.global_position = _calculate_wrap(target.global_position)
Next, the built-in _physics_process() method is overrode.
A safeguard is provided first: if there is no valid target or the code is running inside the Godot editor, we can return early.
Otherwise, there are 2 cases:
- If the target is a RigidBody2D we need to handle it differently as we cannot safely update its position during physics calculations. The
_wrap_rigidbody()method will do exactly that (yet to be implemented). - Otherwise, we just update the global_position of the target, based on the return value of the
_calculate_wrap()method (yet to be implemented).
Now we just need to implement the missing private methods.
func _update_screen_size() -> void:
	screen_size = get_viewport().get_visible_rect().size
Updating the screen size uses Viewport.get_visible_rect(). The size of the resulting Rect2D is stored in the member variable we created for the purpose.
func _calculate_wrap(pos: Vector2) -> Vector2:
	if wrap_horizontally:
		pos.x = wrapf(pos.x, -margin, screen_size.x + margin)
	if wrap_vertically:
		pos.y = wrapf(pos.y, -margin, screen_size.y + margin)

	return pos
Calculating the wrapping is next. The built-in wrapf() function is used to overwrite the x and y coordinates of the starting position based on the screen_size and the given margin.
Both the x and y coordinates need to have their corresponding boolean flag set to true to do their wrapping logic.
When everything is done, the new position vector2 is returned.
func _wrap_rigidbody(body: RigidBody2D) -> void:
	var body_rid = body.get_rid()
	var state = PhysicsServer2D.body_get_direct_state(body_rid)

	if state:
		var current_pos = state.transform.origin
		var new_pos = _calculate_wrap(current_pos)

		if new_pos != current_pos:
			var new_transform = state.transform
			new_transform.origin = new_pos
			state.transform = new_transform
Finally, the trickier case of RigidBody2Ds is handled.
Rigidbody2Ds can only be safely modified BEFORE forces are applied to them by the physics engine. There is a built-in virtual method provided for that purpose: _integrate_forces(). The problem is that Wrap2D is an external component that needs to modify the RigidBody2D from the outside.
To simulate the behaviour of the _integrate_forces() method, we can get the same PhyicsDirectBodyState2D object of the RigidBody2D. We use the combination of CollisionObject2D.get_rid() and PhysicsServer2D.body_get_direct_state() for that purpose.
Then, check if there is a valid state or not. If there is, we need to check for wrapping. Then, the current position of the RigidBody2D is checked against the one that our _calculate_wrap() method returns. If they don't match, the RigidBody2D needs to be moved.
However, we can only modify its transform as a whole and Transform2D includes position, rotation, scale and skew as well. So safely modify only the position:
- First, a copy of the current transform is made
- Then, the origin of the copy is set to the new, wrapped position
- Finally, the copy transform overwrites the old transform of the state.
This code safely changes the RigidBody2Ds position when needed.
Example Use Case
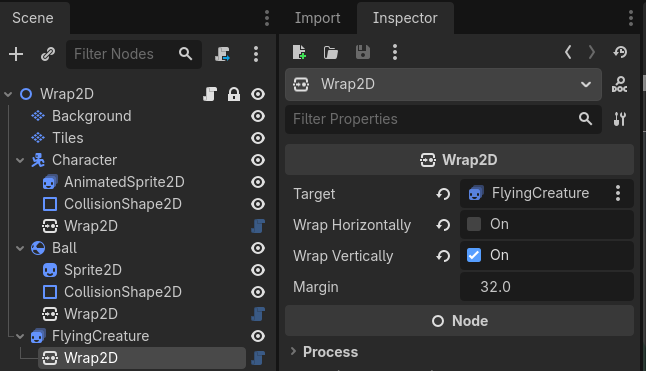
Take a look at this Scene setup:
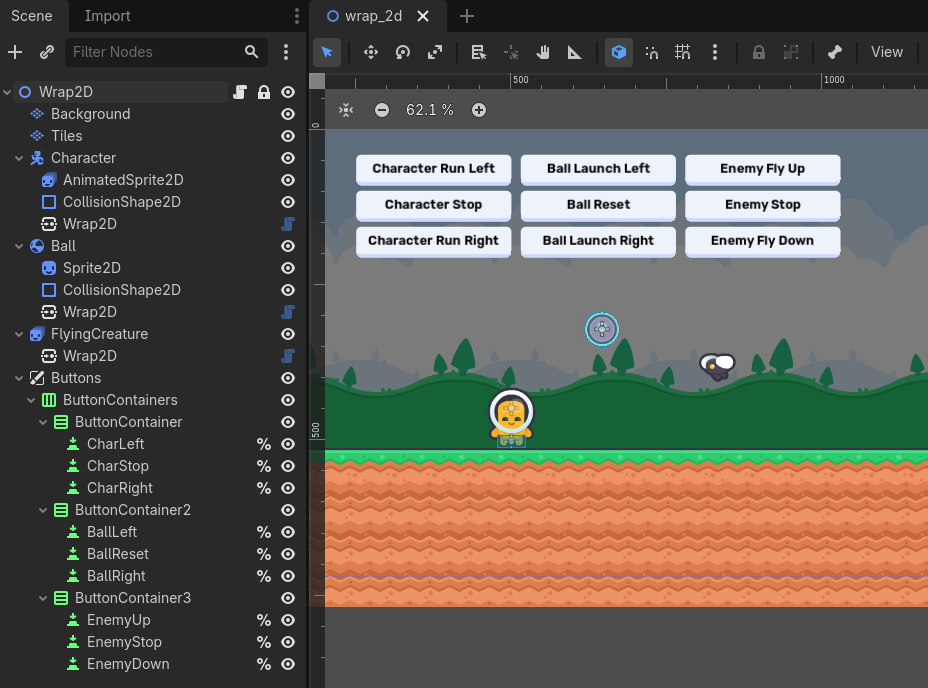
To make everything as simple as possible, everything is controlled with buttons in this demo. Three Wrap2D components are added to the three objects, with the following setup:
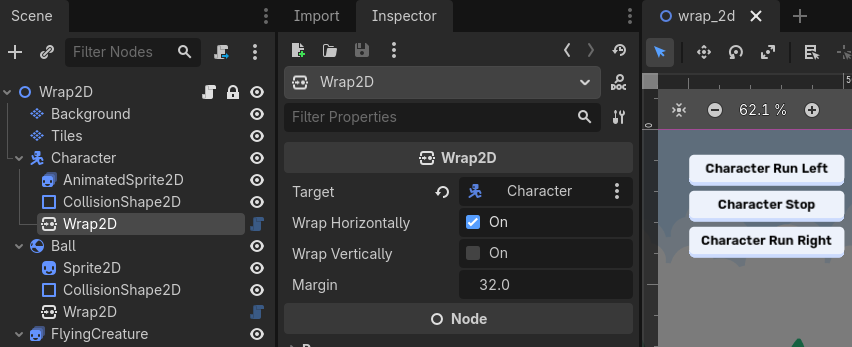
The first one is added to a CharacterBody2D (Character), and it only wraps on the horizontal axis.
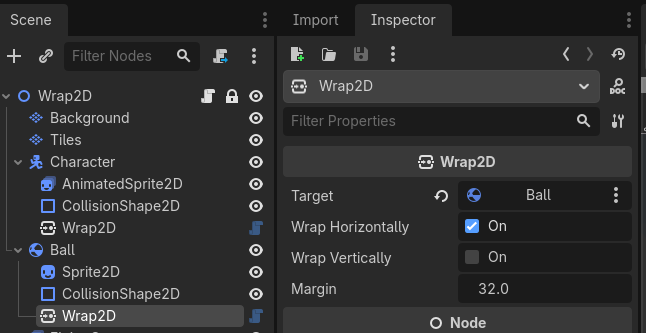
The second Wrap2D is added to a RigidBody2D (Ball), and it only wraps on the horizontal axis.
The last one targets a simple Node2D, more specifically an AnimatedSprite2D node (FlyingCreature), and it wraps on the vertical axis.
The only extra code in this demo scene is attached to the root node:
extends Node2D

var char_speed := 200
var character_dir := Vector2.ZERO
var ball_pos: Vector2
var ball_impulse := Vector2(500, 0)
var ball_offset := Vector2(32, 0)
var flying_creature_dir := Vector2.ZERO
var fly_speed := 250
First, we define a bunch of variables to control the three objects: the character, the ball and the flying creature.
func _ready() -> void:
	ball_pos = $Ball.global_position

	%CharLeft.pressed.connect(func(): character_dir = Vector2.LEFT)
	%CharStop.pressed.connect(func(): character_dir = Vector2.ZERO)
	%CharRight.pressed.connect(func(): character_dir = Vector2.RIGHT)
	%BallLeft.pressed.connect(func(): $Ball.apply_impulse(-ball_impulse, -ball_offset))
	%BallReset.pressed.connect(_reset_ball)
	%BallRight.pressed.connect(func(): $Ball.apply_impulse(ball_impulse, ball_offset))
	%EnemyUp.pressed.connect(func(): flying_creature_dir = Vector2.UP)
	%EnemyStop.pressed.connect(func(): flying_creature_dir = Vector2.ZERO)
	%EnemyDown.pressed.connect(func(): flying_creature_dir = Vector2.DOWN)
Then inside _ready, the original position of the ball is stored so it can be reset. Also, anonymous functions are connected to all the different button presses. They either change the direction where the object is going, or apply impulses to the ball.
One exception is resetting the ball which is a bit more complicated. It is implemented in its own separate function.
func _physics_process(delta: float) -> void:
	if character_dir != Vector2.ZERO:
		$Character/AnimatedSprite2D.play("run")
		$Character/AnimatedSprite2D.flip_h = character_dir == Vector2.LEFT
		$Character.velocity = character_dir * char_speed
		$Character.move_and_slide()
	else:
		$Character/AnimatedSprite2D.play("idle")
		$Character.velocity = Vector2.ZERO

	if flying_creature_dir !=  Vector2.ZERO:
		$FlyingCreature.play("fly")
		$FlyingCreature.position += flying_creature_dir * fly_speed * delta
	else:
		$FlyingCreature.play("idle")
Inside _physics_process(), the character and the flying creature play their animations and move. The CharacterBody2D uses move_and_slide(), but the Node2D's position can be updated directly.
func _reset_ball() -> void:
	var state := PhysicsServer2D.body_get_direct_state($Ball.get_rid())
	if state:
		var xform = state.transform
		xform.origin = ball_pos
		state.transform = xform
		state.linear_velocity = Vector2.ZERO
		state.angular_velocity = 0.0
Finally, we implement the method that resets the ball to its original position. The logic is similar to what the _wrap_rigidbody() method does in the Wrap2D component. After getting the state, a new transform is assigned with zero velocity, and the position set to ball_pos which is the starting position we stored inside _ready().
That wraps up the Wrap2D component! (pun intended! 😉)